
How to
How to Screenshot on a Mac: A Comprehensive Guide
Taking a screenshot on a Mac is an essential skill for users looking to capture moments of their digital lives. Whether it’s for work, capturing a snippet of a video call, or saving an image, knowing how to take a screenshot on your Mac can greatly enhance your computing experience. This comprehensive guide will walk you through the various methods of taking screenshots on a Mac, detailing step-by-step instructions to ensure you can capture exactly what you need.
Understanding the Basics
Before diving into the specifics, it’s important to understand the basic commands used for taking screenshots on a Mac. Apple provides several keyboard shortcuts that make screenshotting a breeze, each tailored for different needs. Familiarizing yourself with these shortcuts will allow you to take screenshots quickly and efficiently.
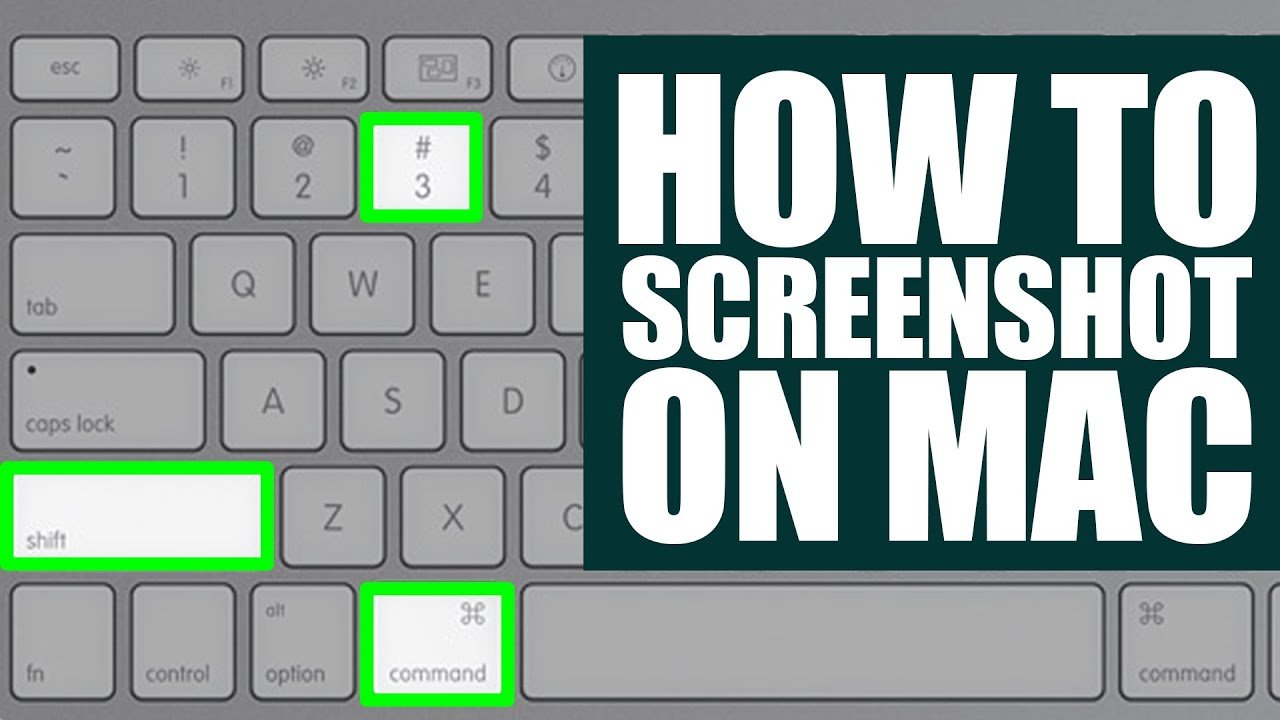
Full Screen Capture
Capturing the entire screen is often the first method users learn. To take a screenshot of your entire screen, simply press Shift + Command + 3. This action captures everything visible on your screen and saves it as a file on your desktop. The simplicity and speed of this method make it a popular choice for general use.
Portion of the Screen
There are many instances where you may only want to capture a specific part of your screen. For this, press Shift + Command + 4. This command changes your cursor into a crosshair, allowing you to click and drag to select the exact area you wish to capture. Upon releasing the mouse or trackpad button, the selected area is captured and saved. This method provides the flexibility to capture precisely what you need without the need for further editing.
Window Capture
Sometimes, you might want to capture a single window without the background or other open applications. This can be done by pressing Shift + Command + 4, followed by the Spacebar. The cursor will change to a camera icon, and you can then click on the window you wish to capture. This method is incredibly useful for tutorials, presentations, or any situation where you need a clean capture of an application window.
Advanced Techniques
Beyond the basics, macOS offers more advanced screenshot tools that provide additional functionality and convenience. These features are especially useful for users who frequently take screenshots for professional or detailed personal use.
Screenshot Utility
Introduced in macOS Mojave, the Screenshot Utility tool is a powerful addition to the Mac’s screenshot capabilities. Accessible by pressing Shift + Command + 5, this tool presents a user-friendly interface with options for capturing the entire screen, selected windows, or a selected portion of the screen. Additionally, it offers options for recording your screen, perfect for creating tutorials or recording gameplay. The utility also allows you to choose where to save your screenshots, add a timer, and select other options before taking a screenshot.
Editing and Annotating
Once you’ve taken a screenshot, macOS allows you to quickly edit and annotate it without the need for third-party software. When a screenshot is taken, a thumbnail appears temporarily in the corner of your screen. Clicking on this thumbnail opens the screenshot in a markup view, where you can crop, rotate, add text, shapes, or even sign documents. This immediate access to editing tools streamlines the process, making it efficient to finalize your screenshot for any purpose.
Tips for Perfect Screenshots
While knowing how to take a screenshot is fundamental, there are several tips and tricks to enhance the quality and utility of your screenshots.
- Use keyboard shortcuts: Memorizing the keyboard shortcuts for screenshots can significantly speed up your workflow.
- Leverage the Screenshot Utility: For more complex needs, the Screenshot Utility tool offers customizable options that can cater to specific requirements.
- Edit and annotate immediately: Utilize the built-in editing tools to make your screenshots presentation-ready without leaving your screen.
- Practice precise selection: When capturing only a portion of the screen, take a moment to precisely select the area you need to avoid the necessity of re-capturing or excessive editing.
- Explore third-party tools: For users with more advanced or specific screenshot needs, various third-party applications offer additional features and flexibility beyond what’s built into macOS.
Conclusion
Taking screenshots on a Mac is a straightforward process, but knowing all the methods and shortcuts available can significantly enhance your ability to capture exactly what you need. From capturing the entire screen to selecting precise areas or individual windows, macOS provides a robust set of tools for screenshotting. Additionally, with the Screenshot Utility and built-in editing options, refining and managing your screenshots has never been easier. By following this guide and practicing the techniques described, you’ll be well-equipped to capture perfect screenshots on your Mac, whatever your needs may be.
FAQs on How to Screenshot on a Mac
1. Can I take a screenshot on a Mac without a keyboard?
Yes, you can use the Screenshot Utility tool to take screenshots without keyboard shortcuts. Access it by going to Applications > Utilities > Screenshot, or search for “Screenshot” using Spotlight. This tool allows you to choose from various screenshot options, including capturing the entire screen, a window, or a selected portion.
2. Where do screenshots go on a Mac?
By default, screenshots are saved to your desktop as PNG files. The filename will start with “Screen Shot” followed by the date and time the screenshot was taken. However, you can change the default save location using the Screenshot Utility or Terminal commands.
3. How do I change the screenshot file format on my Mac?
To change the default file format of your screenshots, you will need to use Terminal. Open Terminal and enter a command like defaults write com.apple.screencapture type jpg (you can replace “jpg” with your preferred format such as PNG, PDF, GIF, etc.), then type killall SystemUIServer to apply the changes.

The Benefits of Hiring Professional Glass Repair Services

How to Apply For National Insurance Number

Palmetto State Armory: Revolutionizing the Firearms Industry

Boot Barn: Pioneering the Western Lifestyle

Krispy Kreme: A Glazed Tale of Sweet Success

Navigating the Digital Future: Understanding NcedCloud

Prince Harry: A Modern Royal in a Traditional World

The Ultimate Guide to PCPartPicker: Revolutionizing PC Building

How to Roast Garlic: A Culinary Guide to Unleashing Flavor

The Ultimate Guide on How to Make Eggy Bread

SWGoH Web Store Guide: Maximize Your Galaxy of Heroes Experience

Boston 25 News: Your Trusted Source for Reliable Updates and In-Depth Coverage

Perfect Sliders: A Cheeseburger Delight Recipe

Top Picks for Project Free TV Alternatives: Your Must-See Guide!

Chrissy Metz Weight Loss Journey in 2023

Ztec100 Tech Fitness: Revolutionizing Your Workout Routine

6 Tips to Train Your Labrador Retriever

Edward Jones Login Guide: Steps to Securely Access Your Account

The Intriguing World of H5 Firekirin: An In-Depth Exploration

Matalan Launches Retail Expansion into the Channel Islands
The Benefits of Hiring Professional Glass Repair Services
How to Apply For National Insurance Number
Palmetto State Armory: Revolutionizing the Firearms Industry
Boot Barn: Pioneering the Western Lifestyle
Krispy Kreme: A Glazed Tale of Sweet Success
Navigating the Digital Future: Understanding NcedCloud
Prince Harry: A Modern Royal in a Traditional World
The Ultimate Guide to PCPartPicker: Revolutionizing PC Building
How to Roast Garlic: A Culinary Guide to Unleashing Flavor